Open up a new presentation in Google Slides. Choose your background: Search “wall and floor backgrounds” in Google Image Search, and choose one that you like! The one I used in the example is circled.
Bright Ideas: Create a Scholastic News Digital Library
Bright Ideas: Create a Scholastic News Digital Library
Learn how to create your own digital library using Scholastic News and Bitmojis.
Learn how to create your own digital library using Scholastic News and Bitmojis.
Editor’s note: Krista Titchener has been teaching elementary students for 22 years, most recently as a third-grade reading and writing teacher. She is a self-professed bookworm and loves to inspire students to become lifelong readers. She also loves using Scholastic News to engage students with nonfiction and teach critical comprehension skills.
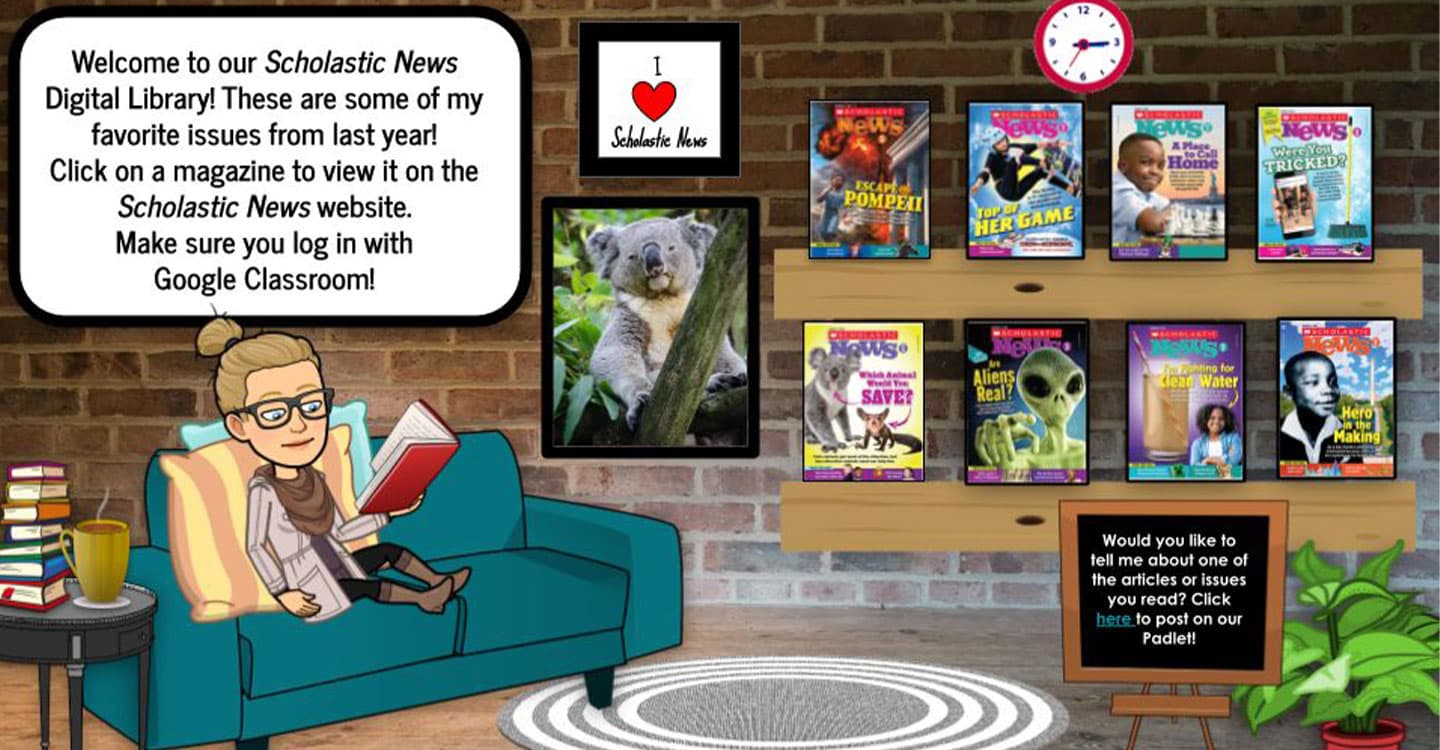
This past spring, many schools were faced with the challenges of distance learning. Without access to our class library and the paper issues of Scholastic News, I needed to come up with an alternate way for students to access text. So I combined elements of a Bitmoji classroom with my love of Scholastic News to create a virtual library. I had so much fun creating it and, most importantly, the digital library helped my students engage more with nonfiction text.
This fall, I’ll introduce my new class of students to the Scholastic News archives while we wait for the new subscription year to begin. I’ll share my digital library through Google Classroom, but you can use other educational platforms such as Microsoft Teams or Seesaw. The video above will walk you through the steps to create your own digital library, or you can keep reading for the directions. Put your own spin on it to show your teaching personality. I hope you and your students enjoy your virtual Scholastic News library!
Click here to make your own copy of Krista's Digital Library!
Step 1
Step 1
Step 2
Step 2
To find objects for your classroom library, choose insert>image>search the web. Then type what you’re looking for in the search box, adding the word “transparent” at the end. I searched “floating shelf transparent” for the shelves I used.
Step 3
Step 3
Right-click on images to bring up format options, such as recoloring the object, flipping, or adding a shadow. Right-click and use “order” to send an image behind or in front of another image.
Step 4
Step 4
Create your Bitmoji in the app (search “read” for the one I used), and add it as an image. Tip: To find a full body Bitmoji, use search words “pose,” “lean,” and “point.”
Tip: I created my Bitmoji using the app, but when I work on my computer, I use the Bitmoji Chrome extension to search for and copy images.
Step 5
Step 5
Log in to the Scholastic News website to search for issues you want to add to your library. Take a screenshot of the covers (on a Macbook, press shift+command+4 at the same time. You’ll see a selector tool, which you can use to drag over each cover to take a screenshot). Add the screenshots of the Scholastic News covers to your virtual library. Choose insert>image>upload from computer. Resize the covers to fit on the shelf.
Step 6
Step 6
Link each of the cover images to the digital version of the magazine on the Scholastic News website. For my students, I like to link to the landing page of the issue, as shown in the image below. Click on the share button, and choose “Copy Link.”
Step 7
Step 7
Right-click on the magazine cover in your library, and then click the link icon. Paste the copied link in the box and click “Apply.”
Step 8
Step 8
In this example, I shared the slide through Google Classroom as an assignment (ungraded and no due date). You can also share it in the stream in Google Classroom.
Repeat steps 6 and 7 with the other issues on your virtual shelf. When finished, share this with your students through Google Classroom (choose “View Only”), Seesaw, or any other site that allows you to share slides with your class. Students will click on the issue of their choice, and log in to Scholastic News using Google Classroom, Clever, or your class code.
I hope your students enjoy visiting your Scholastic News Digital Library!